If you've received your Marty after 2020 it's likely you have a version 2!
Following on from a forum post I made a while ago, this article is going the be the first in a series showing how to add and use a Raspberry Pi and camera to Marty. We’ll use football as an example activity for this.
I’ll also explain more about what ROS (the Robot Operating System) is, and why its so awesome.
I’ll try and keep things as simple as I can, but to get the most from this you should have some knowledge of Python, and be comfortable typing stuff into a terminal. I’ve tried to explain the gist of what’s happening in each step, but there are some topics here that could (and do!) have entire books written about them. We’ll go into more detail on some of the aspects in the future.
In this post, we’ll cover - How to connect up a Raspberry Pi and camera inside Marty - How to use VNC viewer to control the Raspberry Pi in Marty - How to use ROS to see what the camera can see - How to activate and calibrate ball tracking - How to use ROS to send commands to the control board - How to use ROS to get the ball position
At the end, we’ll have a Marty that can react when shown a ball, and actually walk to it!
You will need
- A Marty
- A Raspberry Pi 3 running our our Raspberry Pi image - get the latest version from here. Raspberry Pi 3 B+ or A+ is recommended
- A Raspberry Pi Camera
- A way to mount the camera on Marty - for example using our 3D printable camera mount, or just some blu-tac or tape.
Note :- if you’ve got an old version of the Raspberry Pi image, you should be able to just update the code rather than downloading a whole new image. In each repo (e.g. ~/marty_ws/src/marty_football), do git checkout dev and git pull origin dev. If in doubt, it’s easier to just download the image and flash a new SD card.
Getting the Pi and camera installed
After loading our image onto an SD card and putting it in your Pi, use the supplied four wire cable to connect your Pi to Marty’s control board, as shown here
Note :- with the Raspberry Pi connected, it will take over control of Marty, so things which work using Marty’s control board’s inbuilt WiFi will no longer function. Basically, with a Pi attached, it’ll take over control, and the old Scratch interface won’t control Marty. It’s very easy to unplug the pi if you want to use scratch again though!
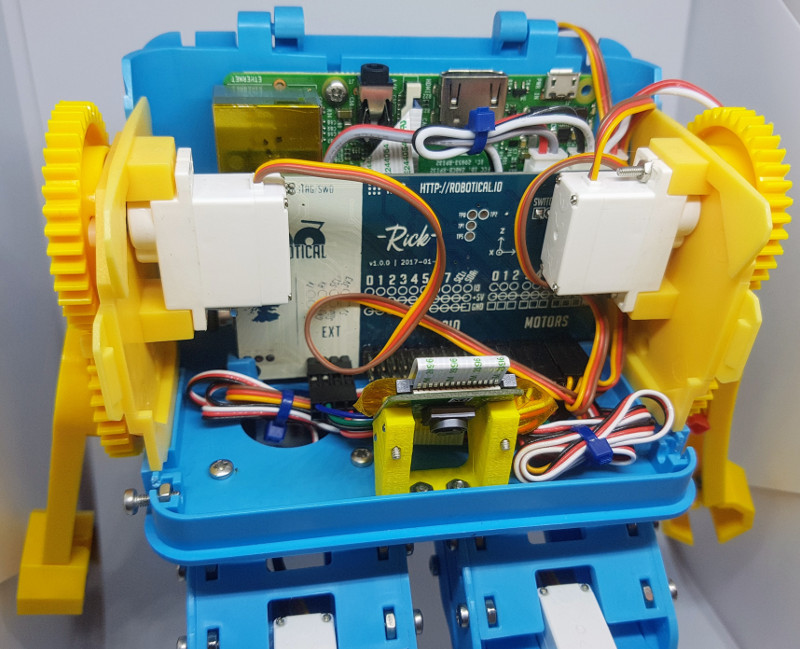
Plug in the Raspberry Pi camera (making sure it’s the right way round!) and install it all, it should end up looking a bit like this:
Be very careful with the Raspberry Pi camera cable, it’s quite delicate. You don’t need to run it under the control board like we (well, Angus) has here, although it is probably the neatest way to do it.
With the camera positioned here, it will face down and look through Marty’s mouth - so you’ll need to remove any stickers you’ve put over there
Get VNC viewer
If you don’t already have it, download VNC Viewer to your computer. We’ll use this to control the Pi on Marty without needing to have plug in a screen or keyboard
Starting up and connecting to Marty Pi’s wifi hotspot
When you turn on your Marty now, the Raspberry Pi will also boot up. After a minute or so you should see a “marty” wifi network apppear. Connect to that using the password “raspberry”
Open up VNC viewer, and connect to “172.24.1.1” (if that doesn’t work, try adding “:1” to the end of the IP) - 172.24.1.1 is Marty’s Raspberry Pi’s IP when you’re connected to its hotspot. The username is pi and the password is marty (on older versions you’ll just need a password, which will be “raspberry”.)
Note that it may take a little while for VNC server to start up on the Raspberry Pi
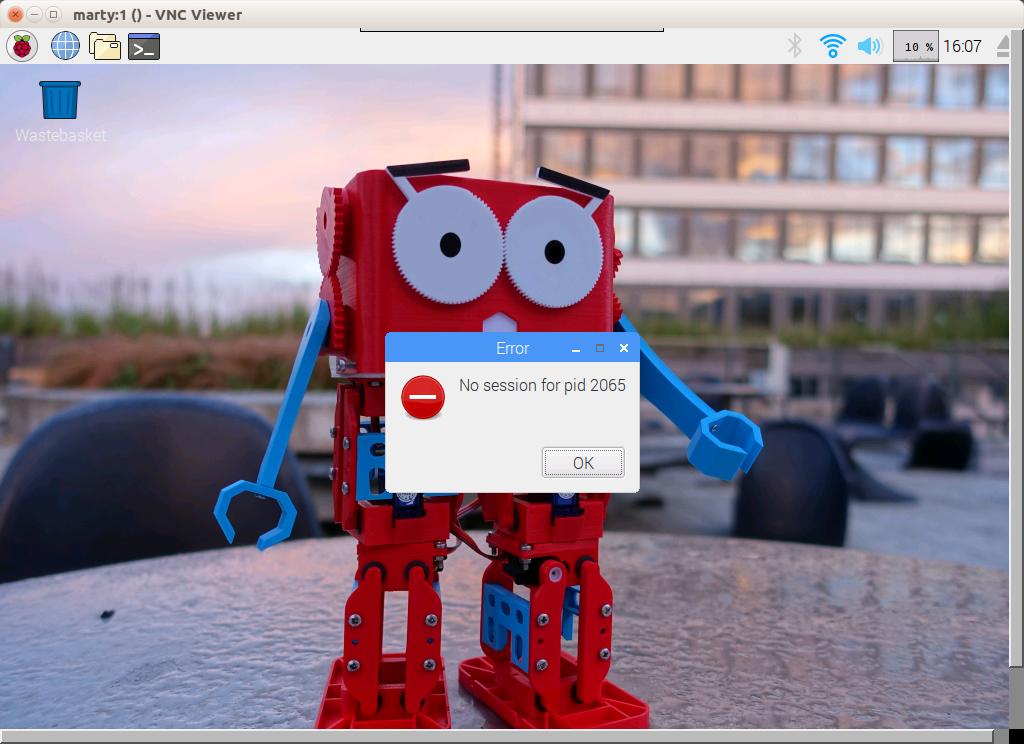
If all goes well, you’ll see a Raspberry Pi Desktop a bit like this:
If you get an error like the above, just click ok.
First time only - initial setup
If this is the first time you’ve tried to control your Marty from an onboard Raspberry Pi, we’ll need to quickly confirm that the calibration is correct
Pi Motor Calibration
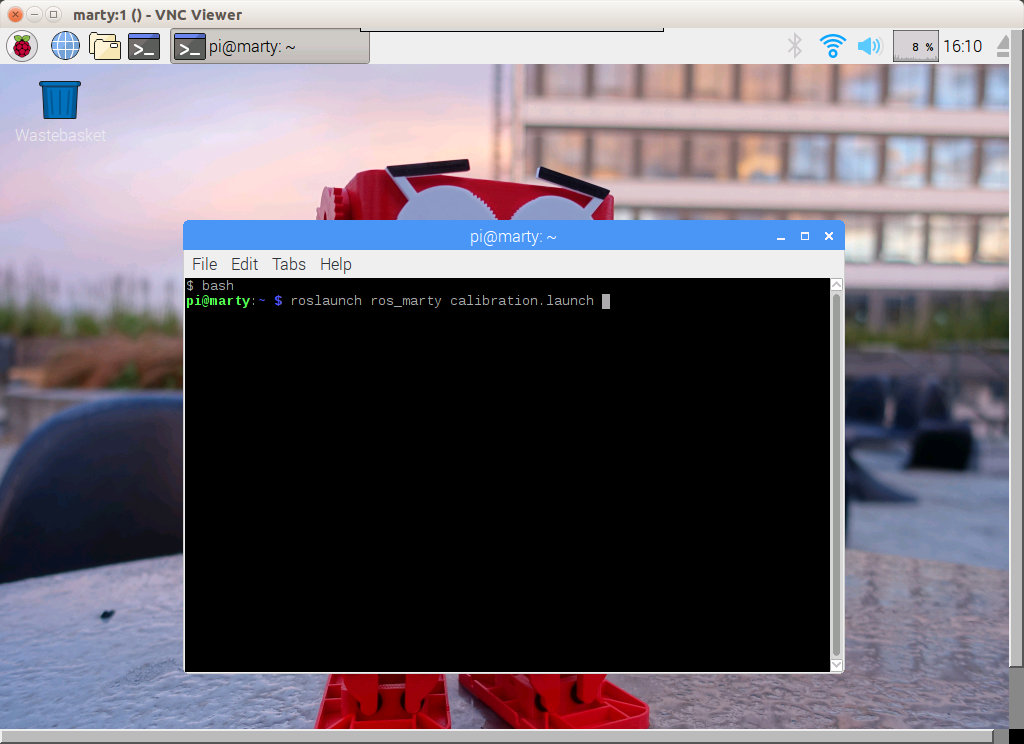
Open up a terminal by clicking on the ![]() icon.
icon.
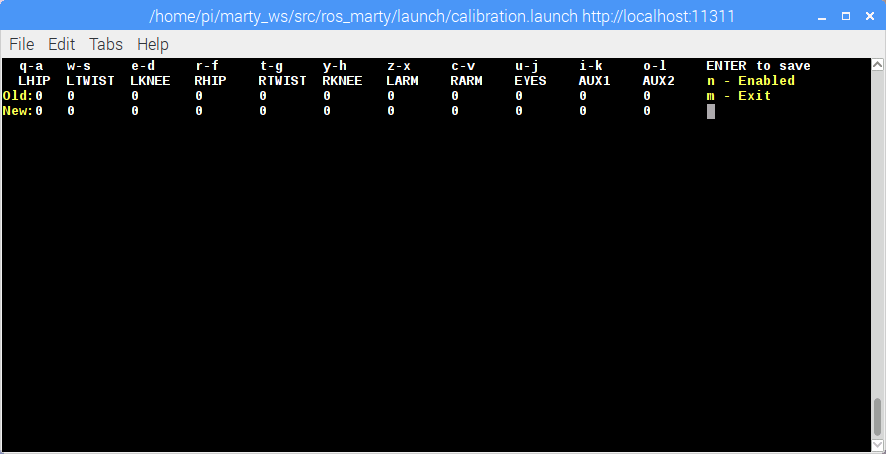
Then, type roslaunch ros_marty calibration.launch and press enter. This will bring up the Marty Raspberry Pi calibration script.
This is just a sanity check that everything is where it should be. Press q to send a movement down, and then a to undo that. Marty should be standing straight. Press Enter and then y to save.
Note - the calibration here is saved to the Raspberry Pi, not to our control board. So if something is amiss it’s actually better to go and fix it using the normal calibration tool. We have this calibration step to let you use hardware other than our control board, so you shouldn’t really need it if you are using our board. You do need to go through the step of saving calibration though, so the system knows it’s safe to send movements.
Telling Marty (and the Pi) is has a camera
Ok, so let’s make sure the camera is enabled on the pi, and tell Marty to use it
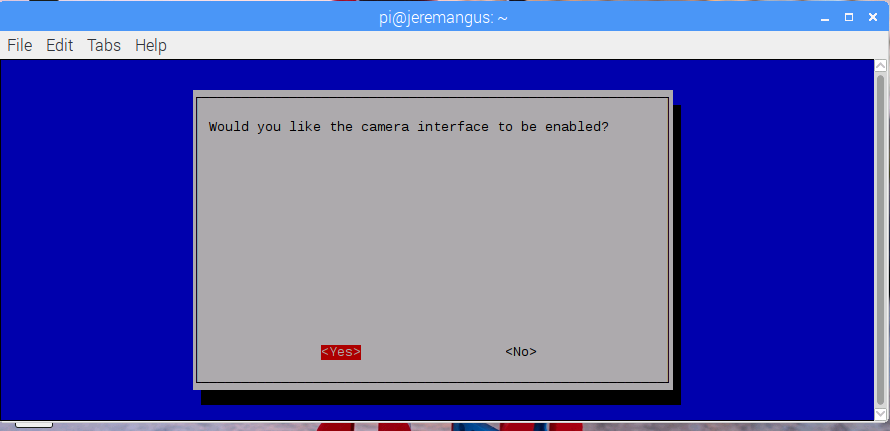
In the terminal, type sudo raspi-config and press enter. You’ll see the Raspberry Pi configuration tool. Go into “5. Interfacing Options”, then “Camera”, and select “Yes” to enable the camera. Then select Finish.
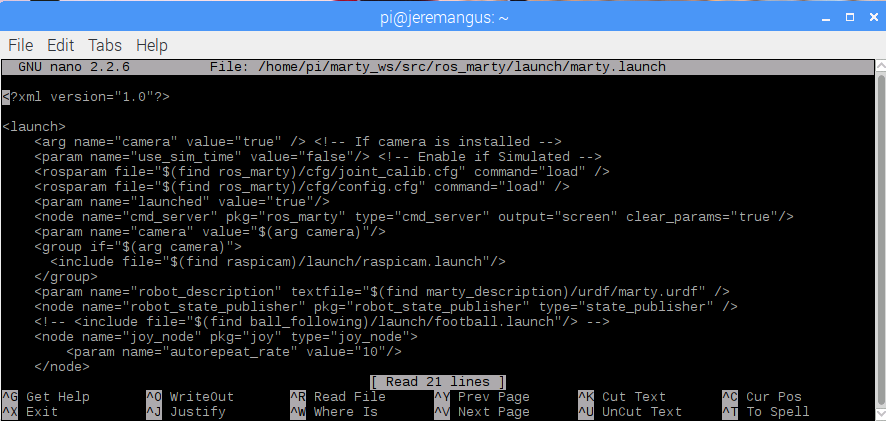
Next, we’ll tell Marty about the camera. We need to edit ~/marty_ws/src/ros_marty/launch/marty.launch, so in the terminal type nano ~/marty_ws/src/ros_marty/launch/marty.launch and press enter
There’s a line near the top which starts with
Press Ctrl-O to save (WriteOut), then Enter to accept the filename. Then press Ctrl-X to exit the editor
Okay! That should be everything set up. For good measure, let’s reboot. Type
sudo reboot now
And press enter.
Once things are back online, Marty should do a little wiggle, and you should connect once more to the “marty” network, and restart VNC viewer.
You won’t need to run those setup steps again. So now on to the fun stuff!
Starter scripts
If you just wanna play around, there are some scripts on the desktop of our Raspberry Pi image which will start up a ball follower, and open the camera view, and configuration tool.
Looking at the camera
Ok, let’s see what’s happening. Open a terminal and type rqt_image_view, then hit Enter
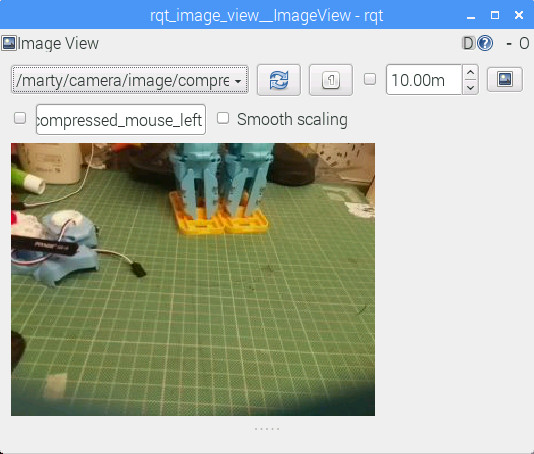
After a few seconds, a window should pop up. This is a ROS utility for viewing image data. There’s a dropdown box in it, and from that box you should select /marty/camera/image
And with that, if everything is connected right you’ll see what Marty’s camera can see!
Pretty darn cool, huh?
Starting ball tracking
What would be even cooler though, would be to track an object. One relatively simple thing to do is track a coloured blob, so let’s do that
There’s already some code loaded onto Marty for this, so let’s get it running. In the terminal
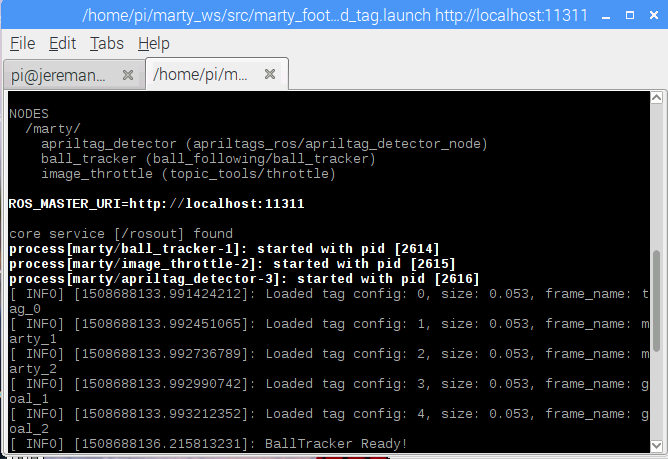
Start a new tab in the terminal (Ctrl-Shift-T, or use tmux if you know what you’re doing!). Type roslaunch ball_following track_and_tag.launch and press enter. This will start up two things - ball tracking and April Tag detection. More on that second one in another post!
You should see something like the above pic in your terminal. That shows that the tracker has loaded, along with tag detection.
Alrighty, lets go back to the image viewer. Click the refresh button ![]() , and you should see a bunch more stuff appear in the dropdown list.
, and you should see a bunch more stuff appear in the dropdown list.
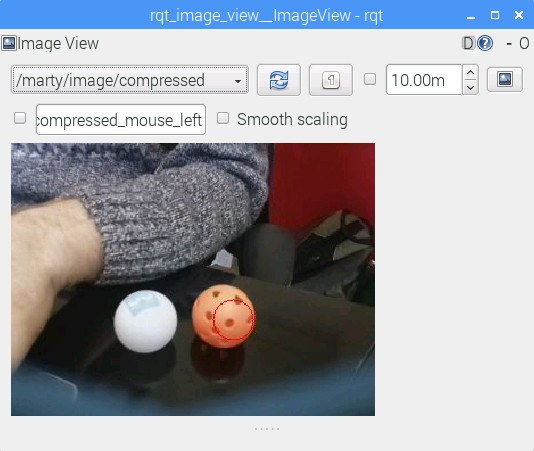
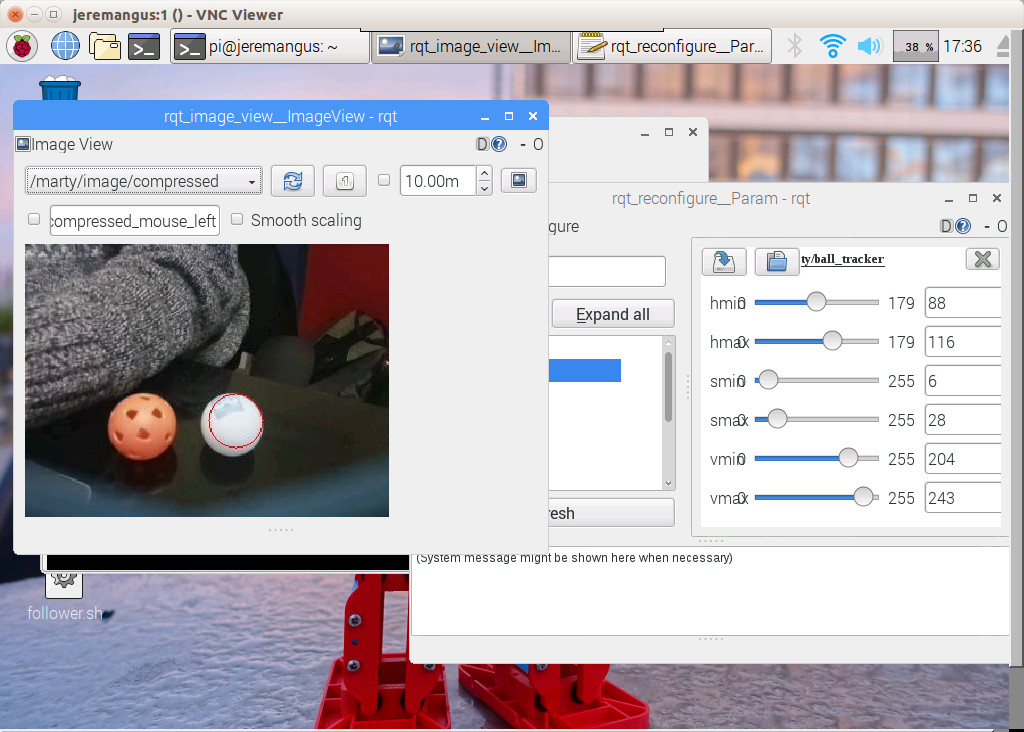
Select /marty/image, and if you happen to have an orange ball sat around - put it in front of Marty. You might see something a bit like this:
Here, the red circle shows that Marty thinks its found a ball! But, it’s not perfect - and chances are that you don’t have an orange ball lying around. Let’s calibrate the detector to detect a white ping poll ball - like the one that came with your Marty - instead
Calibrating ball tracking
To tune in the ball tracker, we’re going to use another feature of ROS that lets us dynamically adjust parameters while code is running. Open a new tab in the terminal, type bash, and then rosrun rqt_reconfigure rqt_reconfigure
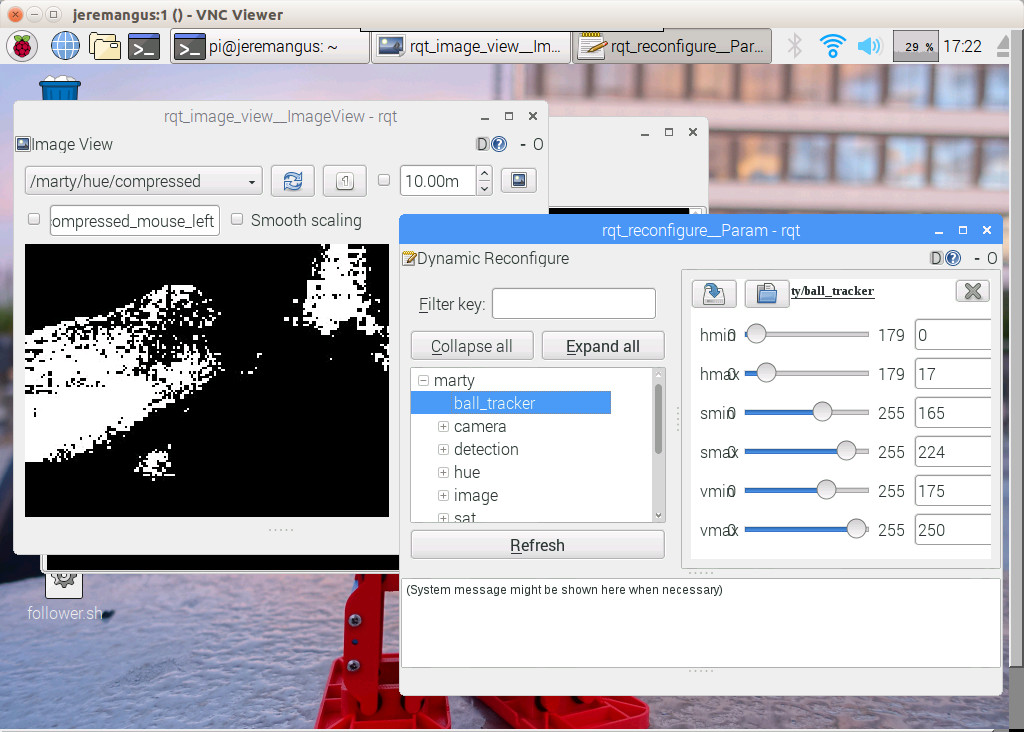
After a few seconds a new window will pop up with the title rqt_reconfigure. In that window expand the menu that says marty, and click on the ball_tracker option. You’ll see some sliders for parameters apppear on the right. These are for Hue, Saturation and Value, which the detector uses to try and identify the ball. In the image viewer, select the /marty/hue topic, and the image will change to a black and white one.
Okay - so the image viewer is now showing the output from the hue part of the ball detector. The white bits pass and the black bits don’t. Ideally the only white shown should be where the ball is - but in practice that rarely happens, which is why we use multiple channels for detection.
Now we want to adjust the hmin and hmax sliders in the rqt_reconfigure window to adjust the hue detection. hmax should always be greater than hmin. Try increasing hmax until the ball turns white in the image viewer, then increase hmin until most of the rest of the image turns black. Don’t be too precise, or it won’t cope well with lighting changes.
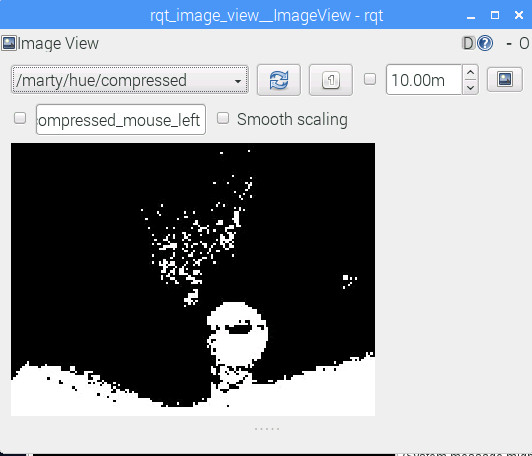
You’ll hopefully end up with something like this:
It’s a bit tricky to see, but the ball is mostly in white there.
Excellent. Now we need to repeat that for saturation and value. Firstly select /marty/sat in the image viewer, and adjust the smin and smax sliders in rqt_reconfigure until the ball is mostly in white, and the rest of the image is mostly black.
Once more, for the value - select /marty/val in the image viewer, and adjust the vmin and vmax sliders
Again - don’t be too precise with these adjustments, leave some wiggle room!
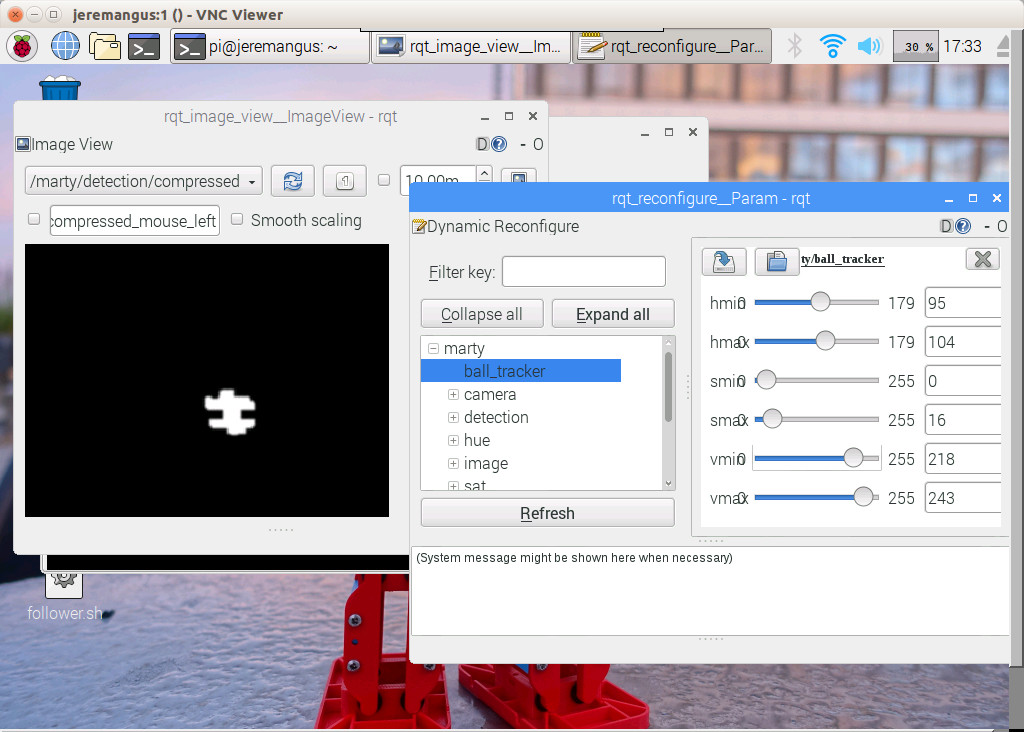
Finally, switch the image viewer to /marty/detection. This shows the output from all three (hue, saturation, value) parts of the detector combined. Hopefully there will be only one bit of the image in white, and that will be the ball. Try moving the ball around to check that it works
Now, if we switch the viewer back to /marty/image, we should see that it is tracking the white ball!
Looking at the ball tracker output
You can visually see what the ball detector is doing in the image viewer, but we’re going to write code that wants to get the position of the ball in co-ordinates.
That’s easy, because the ball tracker is publishing to a ROS topic specifically to carry that data. Lets see what ROS topics there are currently:
Open yet another new tab in the terminal, and (after bash) type rostopic list
You’ll see a big list printed to the screen. Many of those should be familiar from the image viewer - the things we were viewing were topics which had an image type. But there are other topics too - you should see ones for the battery, accelerometer, servos, motor currents, and more.
These topics are how ROS passes data around between different nodes. For example, lets have a look at what’s happening on the battery topic. Type rostopic echo /marty/battery
You should see numbers scrolling past showing the battery voltage.
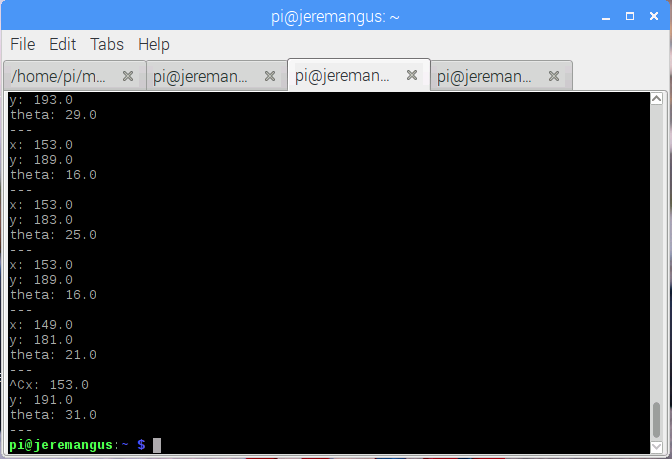
Press Ctrl-C to stop that. Then try rostopic echo /marty/ball_pos
Ctrl-C will again stop it and get you back to the command prompt
You should have seen something like this:
If you move the ball around when that’s running, you should see the co-ordinates change.
Unlike the battery voltage, the ball_pos topic is more than just one number, it has an x coordinate, a y cooordinate, and an angle
To see information on a topic, type rostopic info /marty/ball_pos. That’ll show you that the type is geometry_msgs/Pose2D, and also show you the nodes that are publishing and subscribing to that topic. Publishing meaning writing data, and subscribing meanning reading data. As might be expected, the ball_tracker node, which we started when we ran the roslaunch command earlier, is publishing to the ball_pos topic.
One of the nice things about ROS is that a topic can have multiple publishers and subscribers, which makes connecting bits of code together really nice.
Actually doing something
Here’s where things get even more incredibly exciting. We’re going to write a Python script which will take in the ball position data, and send commands to make Marty move! It’ll be both a subscriber, because it will subscribe to the ball_pos topic, and a publisher, because it will publish to a topic that will send commands to Marty.
The Raspberry Pi on Marty runs the ROS core - which is the bit of software that co-ordinates everything. There is a serial connection between the Raspberry Pi and Marty’s control board, and specific topics are sent over this link. This means that Marty’s control board is part of the ROS system on Marty, and can publish and subscribe to topics.
We’ll be using the /marty/socket_cmd topic to send high level commands to Marty’s control board. By high level, we mean commands like “walk” and “kick”, rather than low level commands like specific joint angles.
There are other ways to control Marty in ROS, but this post is already long enough 
Ok. Let’s make a python script that will send an instruction to Marty’s control board. Open the file browser and go to marty_ws/src/marty_football/ball_following. If there’s not one there already, create a folder called scripts. In that folder create a new file called ball_follower.py
Open it up and copy and paste the following code:
#!/usr/bin/env python
# license removed for brevity

import struct
import rospy
from marty_msgs.msg import ByteArray

def walk_command(steps = 1, turn = 0, move_time = 2000, step_length = 50, side=2):
  cmd = struct.pack('<BBbHBB', 3, steps, turn, move_time, step_length, side)
  return struct.unpack('bbbbbbb', cmd)

def follower():
  pub=rospy.Publisher('/marty/socket_cmd', ByteArray, queue_size=10)
  rospy.init_node('follower', anonymous=True)
  rate=rospy.Rate(0.5)
  while not rospy.is_shutdown():
    cmd=walk_command(1, 0, 1800, 40, 2)
    rospy.loginfo(cmd)
    pub.publish(cmd)
    rate.sleep()

if __name__='__main__' :
  try:
    follower()
  except rospy.ROSInterruptException:
    pass
Save that, and then go back to your terminal
Navigate to the folder by entering cd ~/marty_ws/src/marty_football/ball_following/scripts
Next, let’s enable the servos. we’ll just do that through command line ros, as you do:
rostopic pub /marty/enable_motors std_msgs/Bool true
Once that’s latched, press ctrl-c to exit.
Now let’s run that python script python ball_follower.py
If all goes well, your Marty should walk forwards! Press ctrl-c to stop
So what was that code doing? well, we were using the socket_cmd topic to send commands straight to Marty’s control board. there are a lot of commands you can send, and the full documentation is available on the docs site.
We published a specific series of bytes to that topic, and since the control board subscribes to that topic, it got the command and executed it.
In a bit more detail:
import struct
import rospy
from marty_msgs.msg import ByteArray
Is getting essential tools for this python script. We need rospy to do all the ros-ey things like publishing, we need struct to format the data properly for it to go over to the control board, and we need the ByteArray from marty_msgs.msg because that’s the message type that the socket_cmd topic takes.
def walk_command(steps=1, turn=0, move_time=2000, step_length=50, side=2):
  cmd=struct.pack('<BBBHBB', 3, steps, turn, move_time, step_length, side)
  return struct.unpack('bbbbbbb', cmd)
These next three lines define a function to turn a human readable walk command into a series of bytes that the control board will understand. It’s not essential to understand all the details of this, but if you have a look at the walk command in the socket api you can see a description of what bytes it expects - basically this code squeezes together the instruction code for walk, and all the parameters such as number of steps and step length, into a format that can be published on the socket_cmd topic.
def follower():
This will be the function that does the bulk of the work in this script
pub=rospy.Publisher('/marty/socket_cmd', ByteArray, queue_size=10)
rospy.init_node('follower', anonymous=True)
rate=rospy.Rate(0.5)
These lines set up a publisher on the * marty socket_cmd topic, so that we’ll be able to write data to it. We use the ByteArray* message type. then we initialise a ros node. the rate=rospy.Rate(0.5) sets the frequency we’ll run the main loop at, in this case 0.5hz, or once every two seconds
Then it’s time for the main publishing loop
while not rospy.is_shutdown():
  cmd=walk_command(1, 0, 1800, 40, 2)
  rospy.loginfo(cmd)
  pub.publish(cmd)
  rate.sleep()
These lines of code will run until we stop the node. We use the walk_command function we defined earlier to create a command that will make marty take 1 step forwards, with no turn, an 1800ms step time, 40% step length, and choose which foot to use itself. The 2 as the foot is a code for that, as 0 and 1 can be used to specify which foot to take a step with. The rospy.loginfo line is used to print out information so we can see what’s happening, in this case so we can see that command that’s been constructed then we actually publish that command to the * marty socket_cmd* topic, so that the control board will get it and execute it.
Finally, the rate.sleep causes things to pause until it’s time to run the loop again - remember we set the rate to 0.5hz. The code at the bottom:
if __name__='__main__' :
  try:
    follower()
  except rospy.ROSInterruptException:
    pass
Ensures the follower function is run when we execute the script
Let’s run that script again, but now have a look at marty servo_positions while marty moves.
In a different tab (or using tmux), run rostopic echo marty servo_positions and then start the ball_follower script. In the tab that’s echoing servo_positions, you’ll see a list of numbers a bit like this:
servo_pos: [10, 0, -30, -10, 0, -30, 17, -17, 50]
---
servo_pos: [10, 0, -43, -10, 0, -35, 21, -21, 50]
---
servo_pos: [10, 0, -61, -10, 0, -35, 26, -26, 50]
---
servo_pos: [8, 0, -76, -8, 0, -35, 32, -31, 50]
---
servo_pos: [3, 0, -76, -3, 0, -35, 36, -36, 50]
---
servo_pos: [0, 0, -76, 0, 0, -35, 41, -41, 50]
---
servo_pos: [-5, 0, -76, 5, 0, -35, 45, -45, 50]
---
servo_pos: [-10, 0, -74, 10, 0, -35, 51, -51, 50]
These are the positions Marty’s motors are moving to as he walks. From the left they are left hip, left twist, left knee, right hip, right twist, right knee, left arm, right arm, eyes
The walk command is sent through the * marty socket_cmd topic down to Marty’s control board, which generates the walking movement and publishes the servo positions to the * marty servo_positions topic as marty moves.
Bringing it all together
Ok, so we can track a ball, and command Marty to walk. With the power of ROS let’s bring those two things together.
Modify the script to the following:
#! usr bin env python
# license removed for brevity
import struct
import rospy
from marty_msgs.msg import ByteArray
from geometry_msgs.msg import Pose2D

ball_pos=Pose2D()

def walk_command(steps=1, turn=0, move_time=2000, step_length=50, side=2):
  cmd=struct.pack('<BBbHBB',3, steps, turn, move_time, step_length, side)
  return struct.unpack('bbbbbbb', cmd)

def ball_CB(data):
  rospy.loginfo("ball pos: x - %d y - %d", data.x, data.y)
  ball_pos.x = data.x
  ball_pos.y = data.y

def follower():
  pub=rospy.Publisher('/marty/socket_cmd', ByteArray, queue_size=10)
  rospy.init_node('follower', anonymous=True)
  rospy.subscriber('/marty/ball_pos', Pose2D, ball_CB)
  rate=rospy.Rate(0.5)
  while not rospy.is_shutdown():
    if ball_pos.y> 0:
      if ball_pos.x < 100:
        turn = 100
        step_length = 0
      elif ball_pos.x > 210:
        turn = -100
        step_length = 0
      else:
        turn = 0
        step_length = 40
      cmd = walk_command(1, turn, 1800, step_length, 2)
      rospy.loginfo(cmd)
      pub.publish(cmd)
    rate.sleep()

if __name__ == '__main__':
  try:
    follower()
  except rospy.ROSInterruptException:
    pass
Let’s have a quick look at the changes there
from geometry_msgs.msg import Pose2D

ball_pos = Pose2D()
As we saw earlier, the ball_pos topic uses the Pose2D message type, so we need to import that. Then, we create an instance of the Pose2D type so we can use it in the script. Note:- It’s not very good practice to declare it globally like this, so don’t make a habit of doing stuff like this 
def ball_CB(data):
  rospy.loginfo("Ball pos: x - %d y - %d", data.x, data.y)
  ball_pos.x = data.x
  ball_pos.y = data.y
This is the callback function we’ll use to process any new data that comes in over the ball_pos topic. Quite simply, it updates our local ball_pos object to reflect the new data that’s come in
rospy.Subscriber('/marty/ball_pos', Pose2D, ball_CB)
This sets up the node to subscribe to the /marty/ball_pos topic. Whenever a message is published to that topic, the ball_CB function will be called.
   if ball_pos.y > 0:
      if ball_pos.x < 100:
        turn = 100
        step_length = 0
      elif ball_pos.x > 210:
        turn = -100
        step_length = 0
      else:
        turn = 0
        step_length = 40
      cmd = walk_command(1, turn, 1800, step_length, 2)
      rospy.loginfo(cmd)
      pub.publish(cmd)
Ok, here’s the actual logic for a very basic ball follower! If a ball is detected, the y coordinate (forward-backward) will be greater than zero, so first check means that this block of code will only run if a ball is detected.
Then there is a block of three conditions, based on the x coordinate of the ball. The coordinate is given in pixels, and the image is 320 pixels wide, so an x-coordinate of 160 would mean that the ball was in the middle. So, we check if the ball is off to either side, and set a turn if so. If the ball is near enough to the middle, we set the turn to zero and set a reasonable step length
Next we generate the walk command, except this time using the turn and step_length that are conditional on the ball position.
The rest is pretty much as before.
So what happens when you run it? Save the file and go back to your terminal, as before run python ball_follower.py
You should find that Marty follows the ball!
If you’ve managed to get this far, huge congratulations - you’ve made a walking robot detect and follow a ball! This is university level robotics stuff, and ROS is a real tool that’s used on many academic and production robots.
In future posts, we’ll go into a bit more detail on how to use ROS, and we’ll turn our simple ball follower into a script that can kick a ball, and eventually even line up to a goal before kicking it through!
