Step 1: Installing Python
First you need to make sure you have the Python programming language and the pip command installed on your computer.
There are two versions of Python; Python 2 and Python 3. We need the newer Python 3. Throughout this guide, you will see references to “python and pip commands”. On some systems, these might refer to Python 2 and you might need to substitute python and pip for python3 and pip3 respectively.
If you already know how to open a terminal window (command prompt), you can check that these are installed by running python --version and pip --version. The former should output something like Python 3.8.6 and the output of the latter should start with something like pip 20.1.1 and end with (python 3.8). Make sure the Python versions match (in this case, both are Python 3.8). Also make sure that the Python version is at least 3.6.0. On Linux, this check looks like this:

In windows you can open a terminal window (hit start and type terminal) and try the same commands
Remember to also try python3 and pip3 if python or pip don't work.
If you are setting up Python on a Raspberry Pi, have a look here:
![]() Setting Up Python On Raspberry Pi
Setting Up Python On Raspberry Pi
If you have used Python before, feel free to use your favourite installation method.
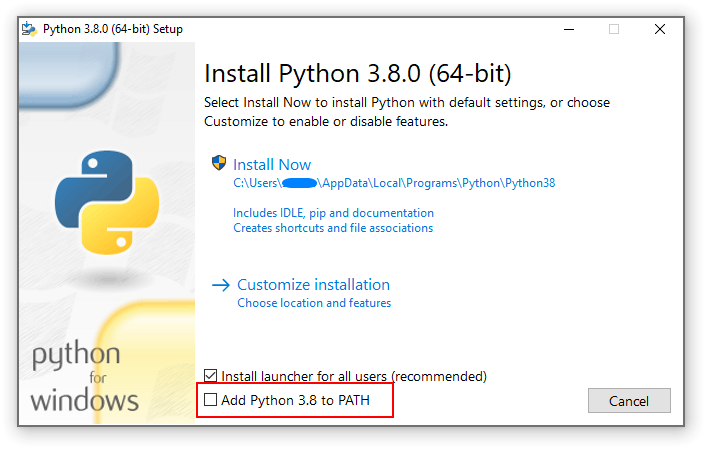
Installing Python on Windows
Go to https://www.python.org/downloads/windows and download the latest release
Unless you are planning on running multiple versions of python, it is important to check the box to “Add Python to PATH” during the install
Installing Python on Chromebook (Linux Support)
Enable Linux (Beta) on Your Chromebook
- Go to Settings.
- Under Advanced, select Developers.
- Click Turn On next to Linux development environment.
- Follow the on-screen instructions to set up Linux. This will install a Debian-based Linux environment.
Update Linux System
- Open the Terminal app from your app drawer.
- Run the following command to update the package lists and upgrade any existing packages:
sudo apt update && sudo apt upgrade
Install Python
- Python might already be installed. Check by typing in Terminal:
python3 --version
- If not installed or to upgrade, run:
sudo apt install python3
Install Pip (Python Package Manager)
- To install pip, run:
sudo apt install python3-pip
- Verify the installation:
pip3 --version
Optional - Install IDE/Text Editor
- Install a text editor or an Integrated Development Environment (IDE) for Python.
- For Visual Studio Code, run:
sudo apt install code
- For PyCharm, refer to the official installation guide or use another IDE of your choice.
Testing Python Installation
- In the Terminal, type:
python3
- You should enter the Python interactive shell indicated by »>.
- Try a simple Python command:
print("Hello, Python!")
Step 2: Installing the martypy Python Library
You should now be familiar with a terminal window (command prompt) so open one up and type the following:
pip install martypy
This will install the martypy Python library onto your computer and it should show something like this to indicate success:
Collecting martypy
  Using cached martypy-2.0-py2.py3-none-any.whl (49 kB)
Collecting pyserial
  Using cached pyserial-3.4-py2.py3-none-any.whl (193 kB)
Installing collected packages: pyserial, martypy
Successfully installed martypy-2.0 pyserial-3.4
Updating martypy:
(No need to do this if you just installed martypy.)
If something doesn't work, you can try updating martypy - maybe it has already been fixed. Updating is very similar to installing martypy. To get the newest version, run the following command:
pip install --upgrade martypy
Step 2.5: Installing ffmpeg
ffmpeg is a tool required for the Marty speak feature. Some systems come with ffmpeg pre-installed, but if this is not the case for your machine, you can follow the next steps to install it.
Windows
- Step 1: Download the ffmpeg build from https://ffmpeg.org/download.html.
- Step 2: Unzip the downloaded file to a directory, e.g., C:\ffmpeg.
- Step 3: Add ffmpeg to your System Path:
- Right-click on 'My Computer' and select 'Properties'.
- Click on 'Advanced system settings' and go to the 'System Properties' window.
- Click on the 'Environment Variables' button.
- In the 'System Variables' section, find and select the 'Path' variable, then click 'Edit'.
- Add the path to your ffmpeg bin directory, e.g., C:\ffmpeg\bin.
- Click 'OK' to close all windows.
- Step 4: Verify the installation by opening Command Prompt and typing ffmpeg -version.
macOS
- Step 1: Install Homebrew if it's not already installed (visit https://brew.sh/) for instructions).
- Step 2: Open Terminal.
- Step 3: Install ffmpeg by typing brew install ffmpeg.
- Step 4: Verify the installation by typing ffmpeg -version in the Terminal.
Ubuntu (Linux)
- Step 1: Open Terminal.
- Step 2: Update the package list by typing sudo apt-get update.
- Step 3: Install ffmpeg by typing sudo apt-get install ffmpeg.
- Step 4: Verify the installation by typing ffmpeg -version in Terminal.
Additional Resources
For more detailed instructions or troubleshooting, visit the official ffmpeg documentation at https://ffmpeg.org/documentation.html.
Step 3: Making sure it worked
Launch IDLE (usually installed along with Python) – this is an application that can be used for executing Python commands interactively.
If you don't have IDLE, don't worry! You can also just open up a terminal window (command prompt) and type the following:
python
(Or python3, on some systems.)
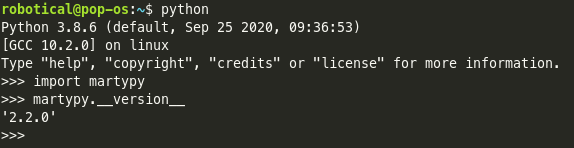
Now you have a _Python Shell_ in front of you. It is great for executing short commands and trying out a few things. For now, let's just verify that martypy was installed correctly.
Type import martypy and hit Enter. A new set of three arrows (>>>) should appear and now you can type martypy.__version__. The output should be something like '2.2.0'. For example:
To do something more exciting with your Python Shell, have a look at First Steps With Python. If you would like to write a bit more than just trivial Python programs, you will need a good text editor so you you can also carry on with the next section while you are setting things up.
If you started your Python Shell from a terminal (command prompt), you can go back there by typing exit().
Setting up a Text Editor
Python programs are written in plain text so you will also need a text editor to write them.
For Windows, Mac and Linux one of the best choices (if you don’t have a personal preference already) is VisualStudio Code which is freely available.
On the Raspberry Pi, raspberrypi.org recommend Thonny which should already be installed.
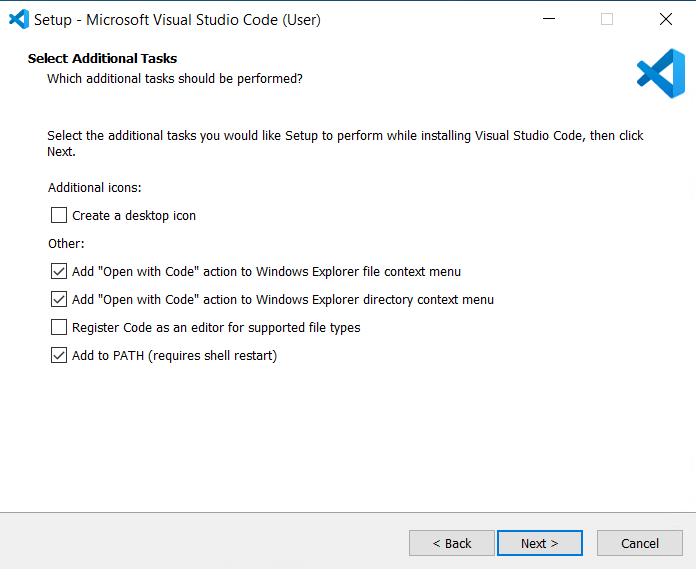
If you are installing VisualStudio Code and are presented with the following screen, we recommend selecting these options:
- _Add “Open with Code” action to Windows Explorer file context menu_
- This will make it easier to open your Python scripts by right-clicking them.
- _Add “Open with Code” action to Windows Explorer directory context menu_
- If you make a directory with all your MartyPy projects, this will let you navigate around it from within VS Code if you right-click the directory and “Open it with Code.”
- _Add to PATH (requires shell restart)_
- This should be selected by default. It makes it easier to launch VS Code in some cases.
If you are using Visual Studio Code then there are extensions which make programming in Python very convenient - there is a nice tutorial on code.visualstudio.com. You can also try out the Pylance extension which makes Python programming even more convenient. At the time of writing, Pylance is still just a _Preview_ version, meaning there might still be problems with it and you may want to hold off installing it untill it's fully ready.
Now you are ready to start programming Marty)