Using Arduino with Marty the Robot
Note: This interface is in early beta and is subject to change
You can connect an Arduino to Marty via the expansion port on Marty's control board, RIC. This will provide power and a serial data connection to the Arduino, and you can write Arduino programs to control Marty
Marty's logic level is 3.3v, so if you are using a cable without any level shifting you must only use 3.3v Arduinos. Using a 5V Arduino may damage your Marty's control board
You will need
- An expansion cable providing a four wire interface
- GND
- 5v
- TX
- RX
- An Arduino with a 3v3 logic level
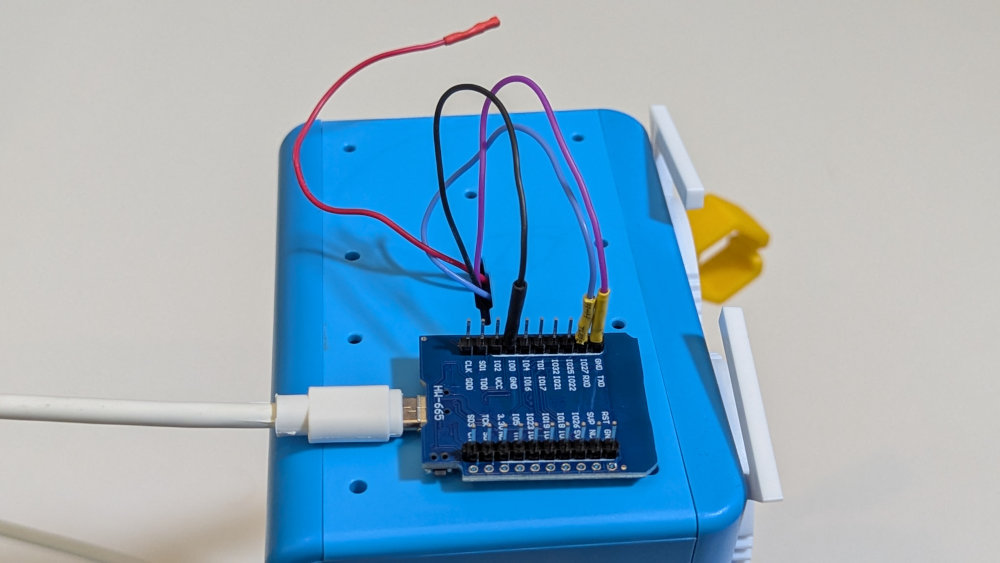
The Arduino connector cable with four wires
Set Up
The Arduino Library
- Download the martyarduino.zip file with the Marty Arduino Library in it
- In the Arduino IDE select from the menu select Sketch → Include Library → Add .ZIP Library…
- Select the MartyArduino.zip file you just downloaded, the Marty library will be added to your sketch
Connecting to Marty
Connect the cable to Marty's control board
Open Marty's face plate by opening the back cover of Marty, removing the top plate, and pushing down on the two small clips at the top of the face
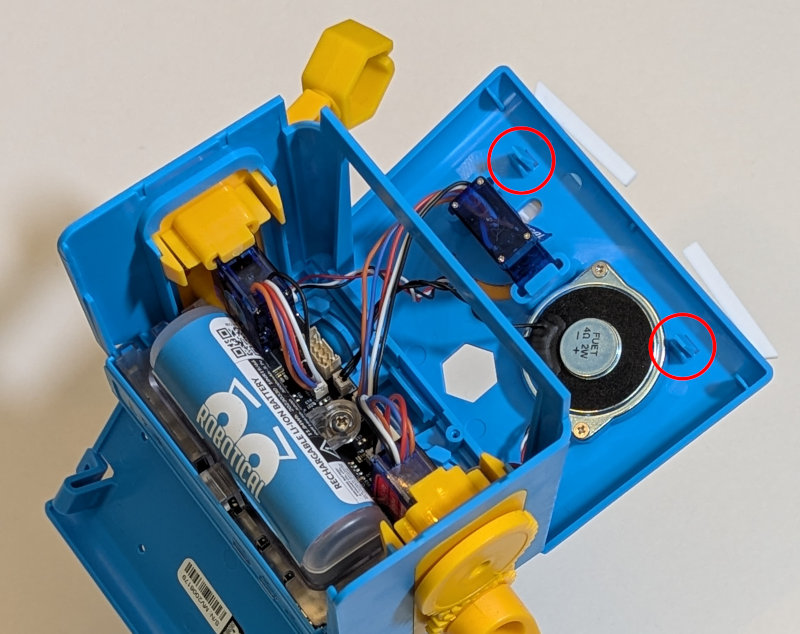
The face plate should be pivoted forward and held in place by the clip at the bottom
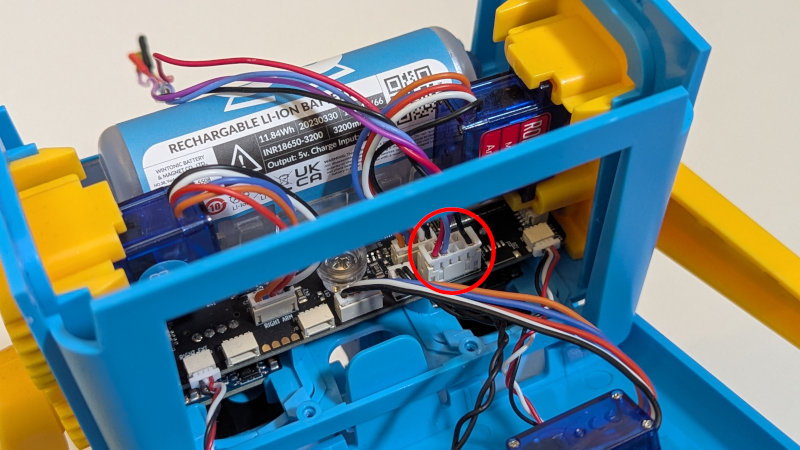
Next, attach the Arduino cable to the expansion port at the front of the control board
Close the face plate again and ensure the two clips at the top of the face are clicked back into position

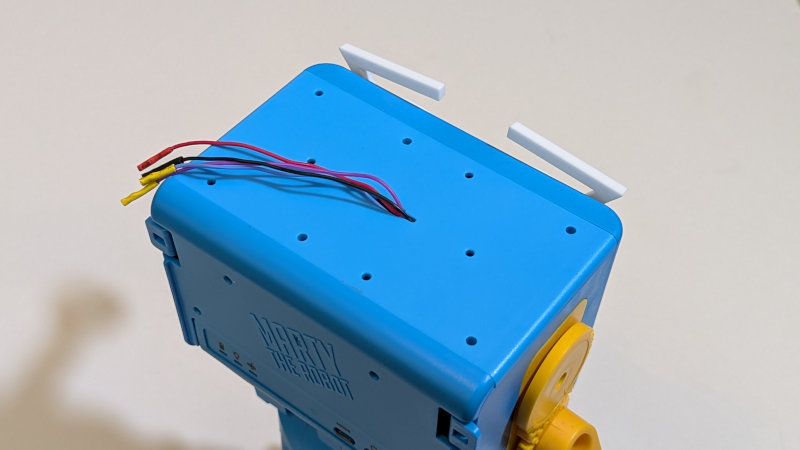
Feed the wires through the slot in the top plate, and reassemble the head
Connect the wires to your Arduino
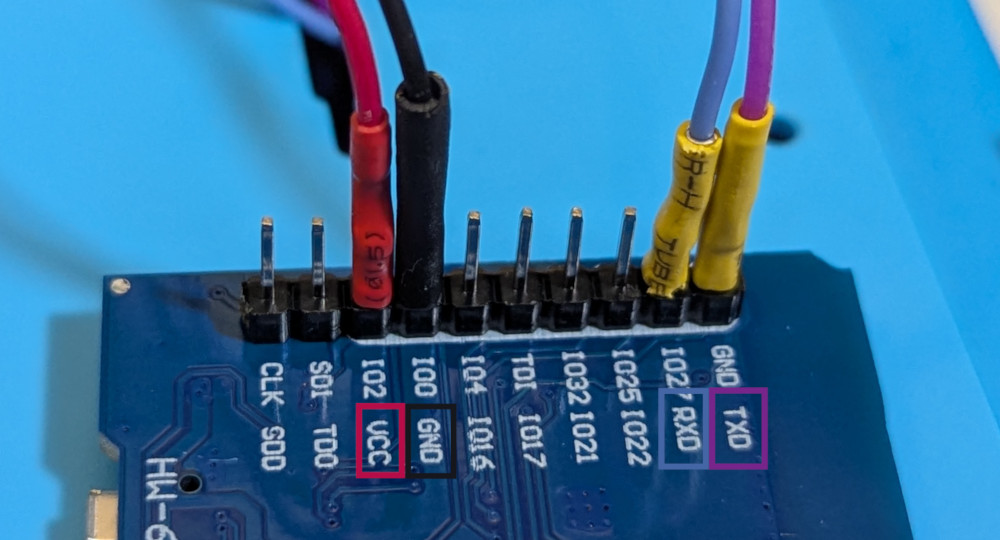
The four wires should be connected as follows
| Wire | Arduino Connection | Note |
|---|---|---|
| Black | GND | |
| Red | VCC | Leave this unconnected while programming the Arduino |
| Blue | RXD | |
| Purple | TXD | |
Writing an Arduino Program
A simple example
A really simple Arduino program for Marty looks like this
#include "MartyArduino.h"

Marty marty(Serial);

void setup() {
  // put your setup code here, to run once:
  marty.init();
}

void loop() {
  // put your main code here, to run repeatedly:
  marty.dance();
  sleep(10);
}
You must include the #include "MartyArduino.hand Marty marty(Serial) lines at the beginning of your program to get access to Marty's functions and instantiate a marty object that will let you talk to Marty. The Serial here specifies which serial port on the Arduino to use - in this case we're using the default one
You must also include the marty.init() line inside your setup function to open the connection to Marty
After that, you can send commands to Marty by calling the appropriate function in the main loop. This example program makes Marty dance repeatedly, waiting 10 seconds in between each dance
Programming the Arduino
Unless you are using a serial port other than the primary one on the Arduino, it is necessary to turn Marty off before programming the Arduino. In this case you will also need to disconnect the 5v power line
A suggested method for programming Marty with the Arduino is this
- Leave the 5v wire disconnected from the Arduino
- With Marty turned off connect the USB cable to your Arduino and program it
- Turn Marty on, and it will run the program you have made
- If you want to change the program, turn Marty off by pressing and holding the power button
- Then you can update the program
- Once you are happy with your program:
- Disconnect the USB cable from the Arduino
- Connect the 5V wire from Marty to the VCC pin on your Arduino
- Turn Marty on. This will power up the Arduino as well, and your Marty will run your program without needing any external connections!
Function Reference
These are just some starter functions as the library is in a very early stage right now, they will be added to in due course
dance
void dance(uint16_t move_time=3000, bool blocking=true)
Makes Marty dance
Arguments:
- move_time - a number in milliseconds for the length of the movement. Defaults to 3000ms
- blocking - Blocking mode override; whether to wait for the physical movement to finish before returning. Defaults to true
wiggle
void wiggle(uint16_t move_time=4000, bool blocking=true);
A bit like dance, but without the hip movements
Arguments:
- move_time - a number in milliseconds for the length of the movement. Defaults to 4000ms
- blocking - Blocking mode override; whether to wait for the physical movement to finish before returning. Defaults to true
sidestep
void sidestep(String side="left", uint8_t steps=1, uint8_t step_length=35, uint16_t move_time=1000, bool blocking=true);
Take a number of sidesteps to the left or right
Arguments:
- side - left or right. Defaults to left
- steps - how many steps to take. Defaults to 1
- step_length - attempted step size in mm. Defaults to 35mm
- move_time - a number in milliseconds for the length of each step. Defaults to 1000ms
- blocking - Blocking mode override; whether to wait for the physical movement to finish before returning. Defaults to true
arms
void arms(int8_t left_angle=0, int8_t right_angle=0, uint16_t move_time=1000, bool blocking=true);
Move Marty's arms to specified angles
Arguments:
- left_angle - the angle to move the left arm to in degrees between -100 and 100. Defaults to 0
- right_angle - the angle to move the right arm to in degrees between -100 and 100. Defaults to 0
- move_time - a number in milliseconds for the length of the movement. Defaults to 1000ms
- blocking - Blocking mode override; whether to wait for the physical movement to finish before returning. Defaults to true
walk
void walk(uint8_t steps=1, int8_t turn=0, int8_t step_length=25, uint16_t move_time=1500, bool blocking=true);
Take a number of steps forwards or backwards, with an optional turn
Arguments:
- steps - how many steps to take. Defaults to 1
- turn - how much to turn on each step, in degrees. Defaults to 0
- step_length - attempted step size in mm. Defaults to 25mm
- move_time - a number in milliseconds for the length of each step. Defaults to 1500ms
- blocking - Blocking mode override; whether to wait for the physical movement to finish before returning. Defaults to true
ledColor
void ledColor(String color="440044", String nameOrType="LEDeye", int8_t ledID = -1);
Set the color of LEDs on Marty - for example the LED eyes
Arguments:
- color - a hexadecimal RGB color value, e.g. FF0000 for red, 0000FF for blue. Defaults to 440044
- nameOrType - the name or type of LED addon. For example 'LEDeye' for both eyes, or 'LeftLEDeye' or 'RightLEDeye' to choose a specific LED eye. Defaults to LEDeye
- ledID - to control only one LED set a numerical ID here. For the eyes this should be from 0-11. Defaults to -1 which will set the color of all LEDs
ledRegion
void ledRegion(String color="004444", uint8_t regionID = 0, String nameOrType="LEDeye");
Set the color of a region of an LED addon. Each LED addon is split into three regions
Arguments:
- color - a hexadecimal RGB color value, e.g. FF0000 for red, 0000FF for blue. Defaults to 004444
- regionID - From 0-2. Defaults to 0
- nameOrType - the name or type of LED addon. For example 'LEDeye' for both eyes, or 'LeftLEDeye' or 'RightLEDeye' to choose a specific LED eye. Defaults to LEDeye
ledOff
void ledOff(String nameOrType="LEDeye");
Turn off the LEDs
Arguments:
- nameOrType - the name or type of LED addon. For example 'LEDeye' for both eyes, or 'LeftLEDeye' or 'RightLEDeye' to choose a specific LED eye. Defaults to LEDeye
ledPattern
void ledPattern(String pattern="rainbow-pinwheel", String nameOrType="LEDeye");
Set the LEDs to a preset pattern
Arguments:
- pattern - rainbow-pinwheel, show-off, or pinwheel. Defaults to rainbow-pinwheel
- nameOrType - the name or type of LED addon. For example 'LEDeye' for both eyes, or 'LeftLEDeye' or 'RightLEDeye' to choose a specific LED eye. Defaults to LEDeye