Adding a Raspberry Pi lets Marty V2 run Python programs on board, including projects using cameras and other Pi peripherals.
Using a Chromebook? You do not need to enable Chromebook Linux for this guide. Linux, Python and MartyPy run on the Raspberry Pi. Your Chromebook, Windows PC or Mac provides remote access to it. Run every terminal command on this page on the Pi, either remotely or using a keyboard and monitor attached to it.
Your computer → network connection → Raspberry Pi running Python → expansion cable → Marty
The network connection is for accessing the Pi. The expansion cable carries commands between the Pi and Marty's RIC control board. Installing a Pi is optional for programming Marty; this guide covers the on-board Pi route.
Prerequisites
- A Marty V2 and the Robotical Raspberry Pi expansion cable matching its connector.
- A Raspberry Pi, microSD card and Raspberry Pi OS. Robotical recommends Pi 3A+, Pi 3B+ or Pi Zero 2 W; see the model and power recommendations. A Zero 2 W needs a fitted GPIO header for the cable. Pi Pico is a microcontroller and cannot follow this Linux/Python workflow. Pi 4 is not recommended for this setup because of power and heat; Pi 5 is not recommended because of power requirements.
- A suitable Pi power supply for initial setup, with the Pi disconnected from Marty, and a way to prepare the microSD card.
- A computer for remote access and a network permitted by your school. A monitor and keyboard connected directly to the Pi can be used for initial setup instead.
For initial SD-card preparation, Raspberry Pi Imager runs on Windows, macOS or Linux. Staff can prepare cards on another computer; students can subsequently use Chromebooks. If the Pi already has a working OS, do not overwrite its card or student files unnecessarily.
Power: Robotical recommends drawing no more than 1A through the expansion header so the motors and other electronics have enough power. Cameras, USB peripherals and intensive workloads add to the demand. Follow the linked hardware recommendations before adding accessories.
Teacher preparation and student use
| Teacher or IT team: once per Pi | Students: each session |
|---|---|
| Prepare the OS, network, account and remote access. | Power on Marty and connect to the assigned Pi. |
| Configure the serial port and install MartyPy. | Open or create a Python file and run it on the Pi. |
| Mount the Pi, connect the cable and check operation. | Save work and shut down the Pi before switching off Marty. |
Start here: follow the Raspberry Pi Primer to prepare the Pi and connect from a Chromebook, PC or Mac. Check that you can open the Pi's terminal before continuing. Keep the Pi on its separate supply and disconnected from Marty while completing software configuration if that is more convenient.
Mounting the Pi
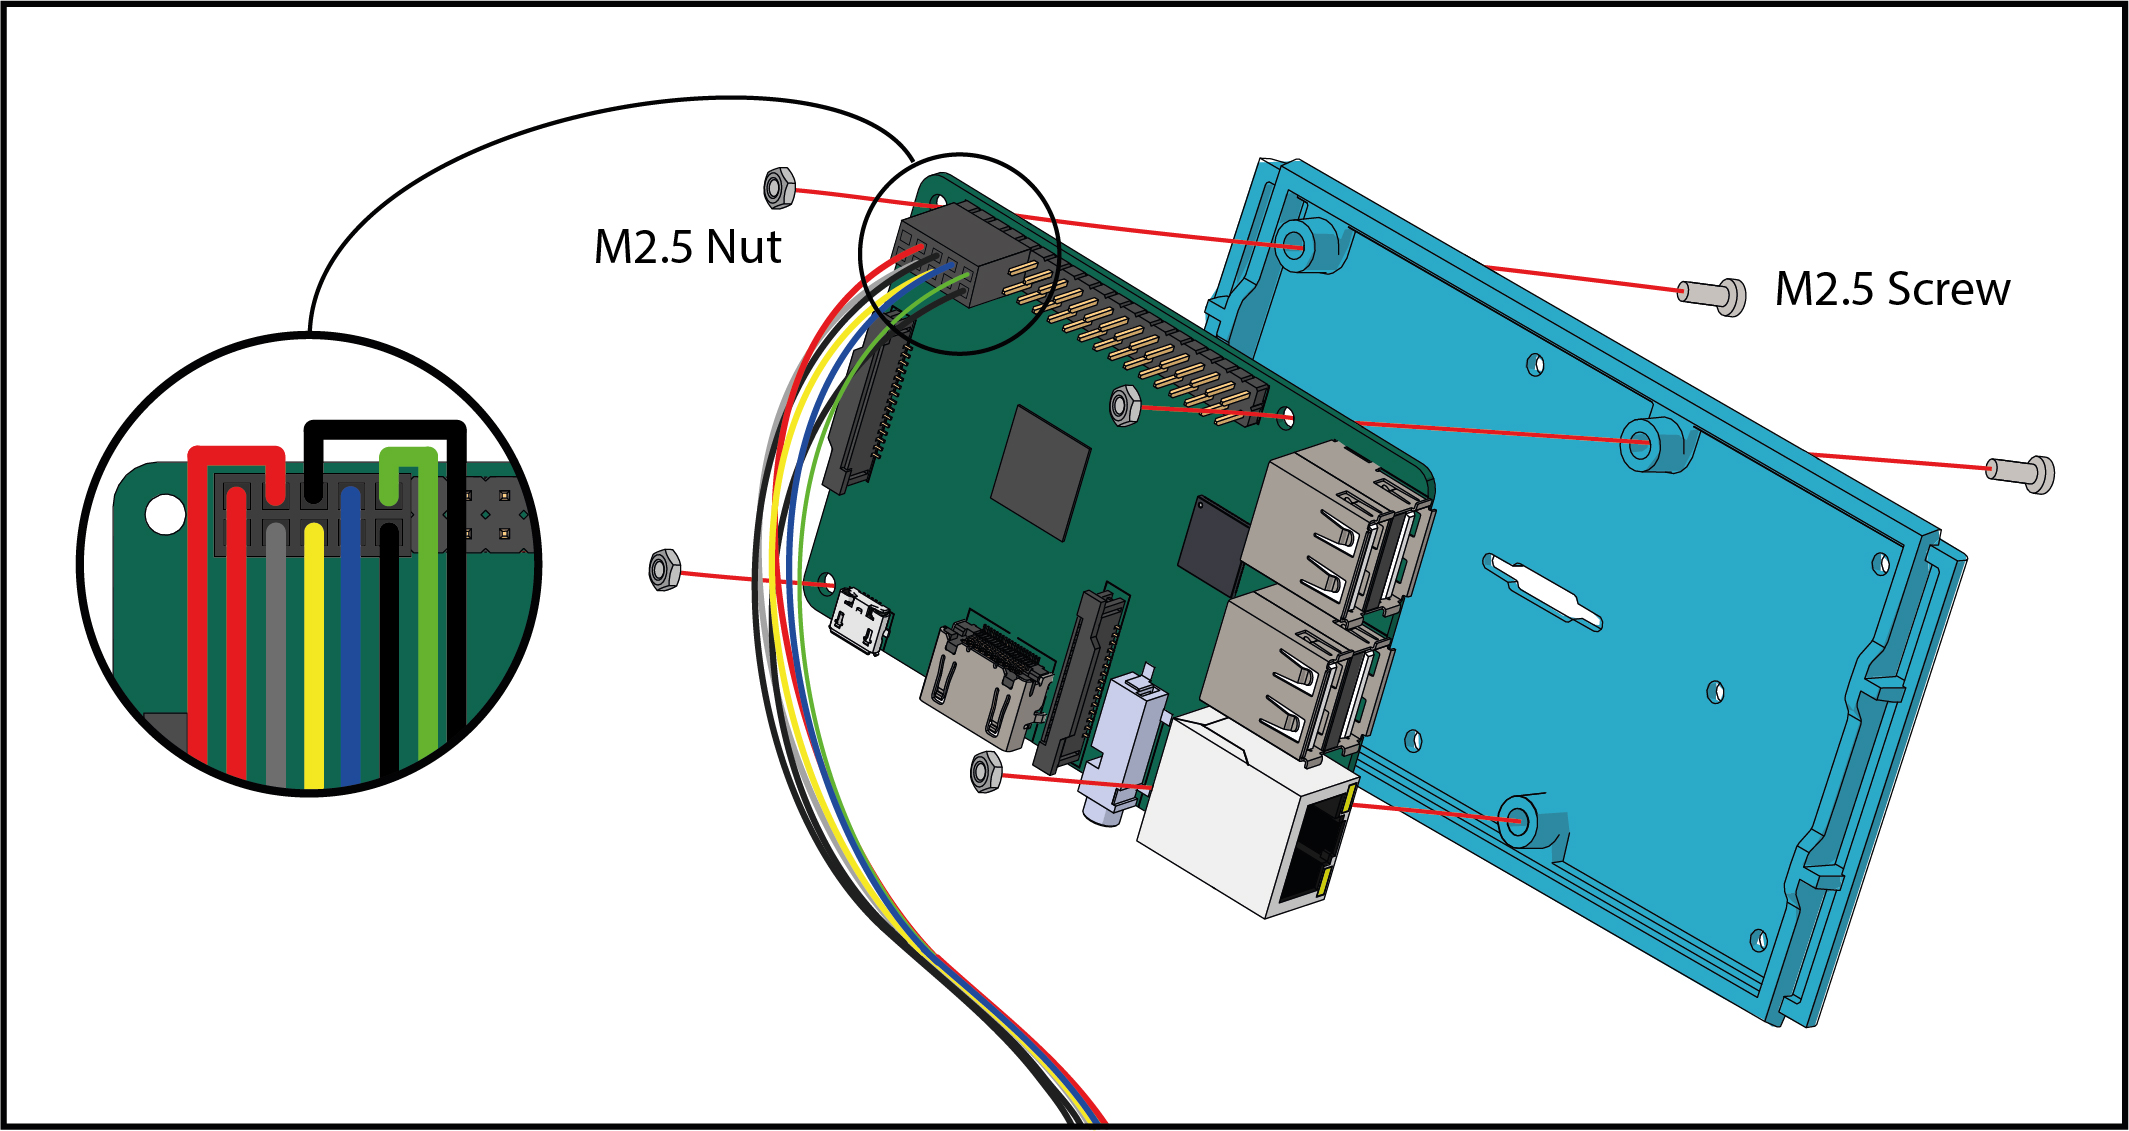
There are 4 standoffs on the inner side of the top lid of Marty's head. These are positioned to match the mounting holes on your Pi so you can easily attach it with 2, 3 or 4 M2.5 screws (with a thread length of 12mm). If you are only using 2 screws, it is best to secure them on two diagonally opposite corners of the Pi rather than two adjacent corners.
Connecting the Pi to RIC
Before wiring, shut down the Pi, switch Marty off and disconnect the Pi's separate power supply. Use the Robotical expansion cable and the pictures below for your connector version. Once connected, Marty supplies power to the Pi through this cable. Do not connect a separate Pi power supply at the same time unless Robotical has confirmed that arrangement for your hardware.
Take the Raspberry Pi cable and connect the end with the smaller, white connector to the port inside Marty's head marked EXTENSION. There is only one way this will fit.
The connector will look like one of these two:
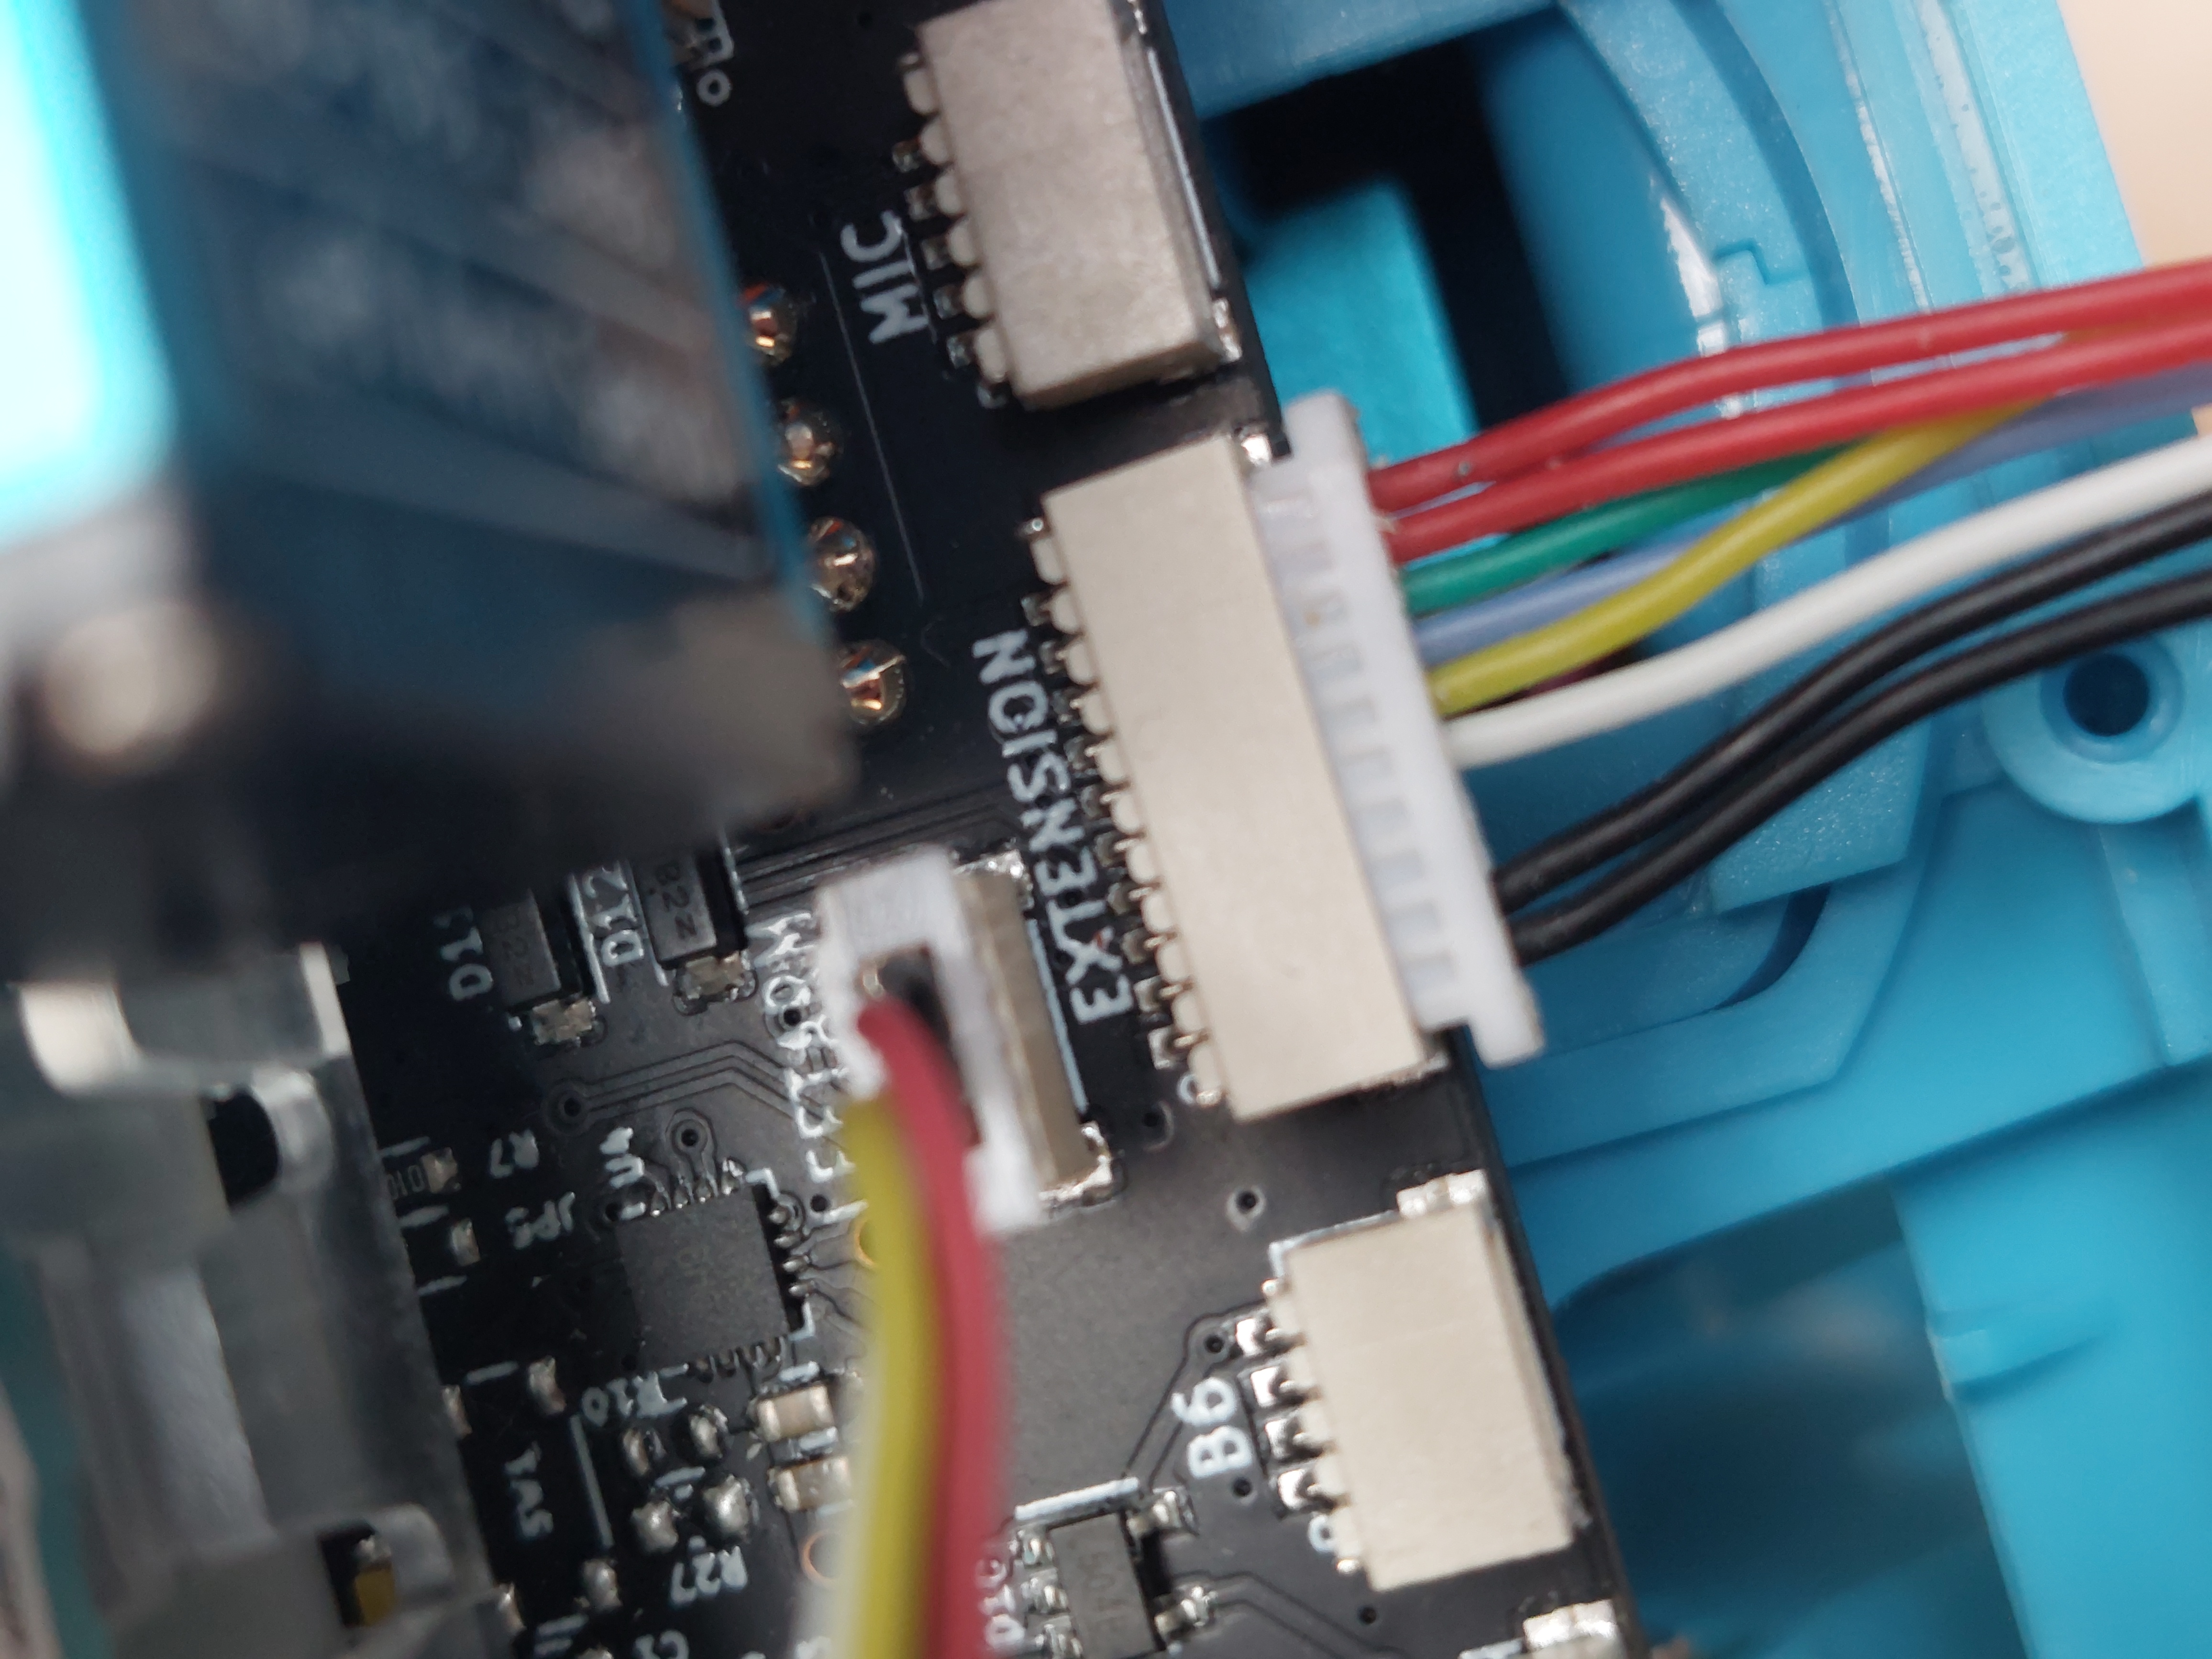
Older Martys will have this style of connector
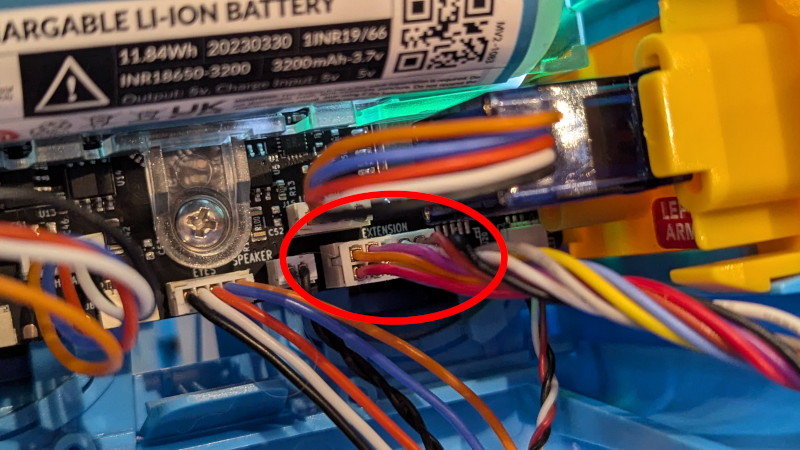
Newer Martys will have this connector
The larger end of your Raspberry Pi cable connects to the side of the Pi's GPIO (General Purpose Input/Output) header, which is closer to the microSD card slot. If your Raspberry Pi cable consists of differently coloured wires, you can locate the red ones and align them with the 5V pins (use a pinout diagram to find the 5V pins). Alternatively, you can locate the corner of the connector that does not have a wire connected to it and align this with pin 1 (3V3 Power) on the Pi.
CAUTION: Make sure Marty is OFF before connecting the Raspberry Pi end of the cable and triple check that the cable has been plugged in the right way around before turning Marty on. Incorrect connection may seriously damage the Pi and/or Marty.
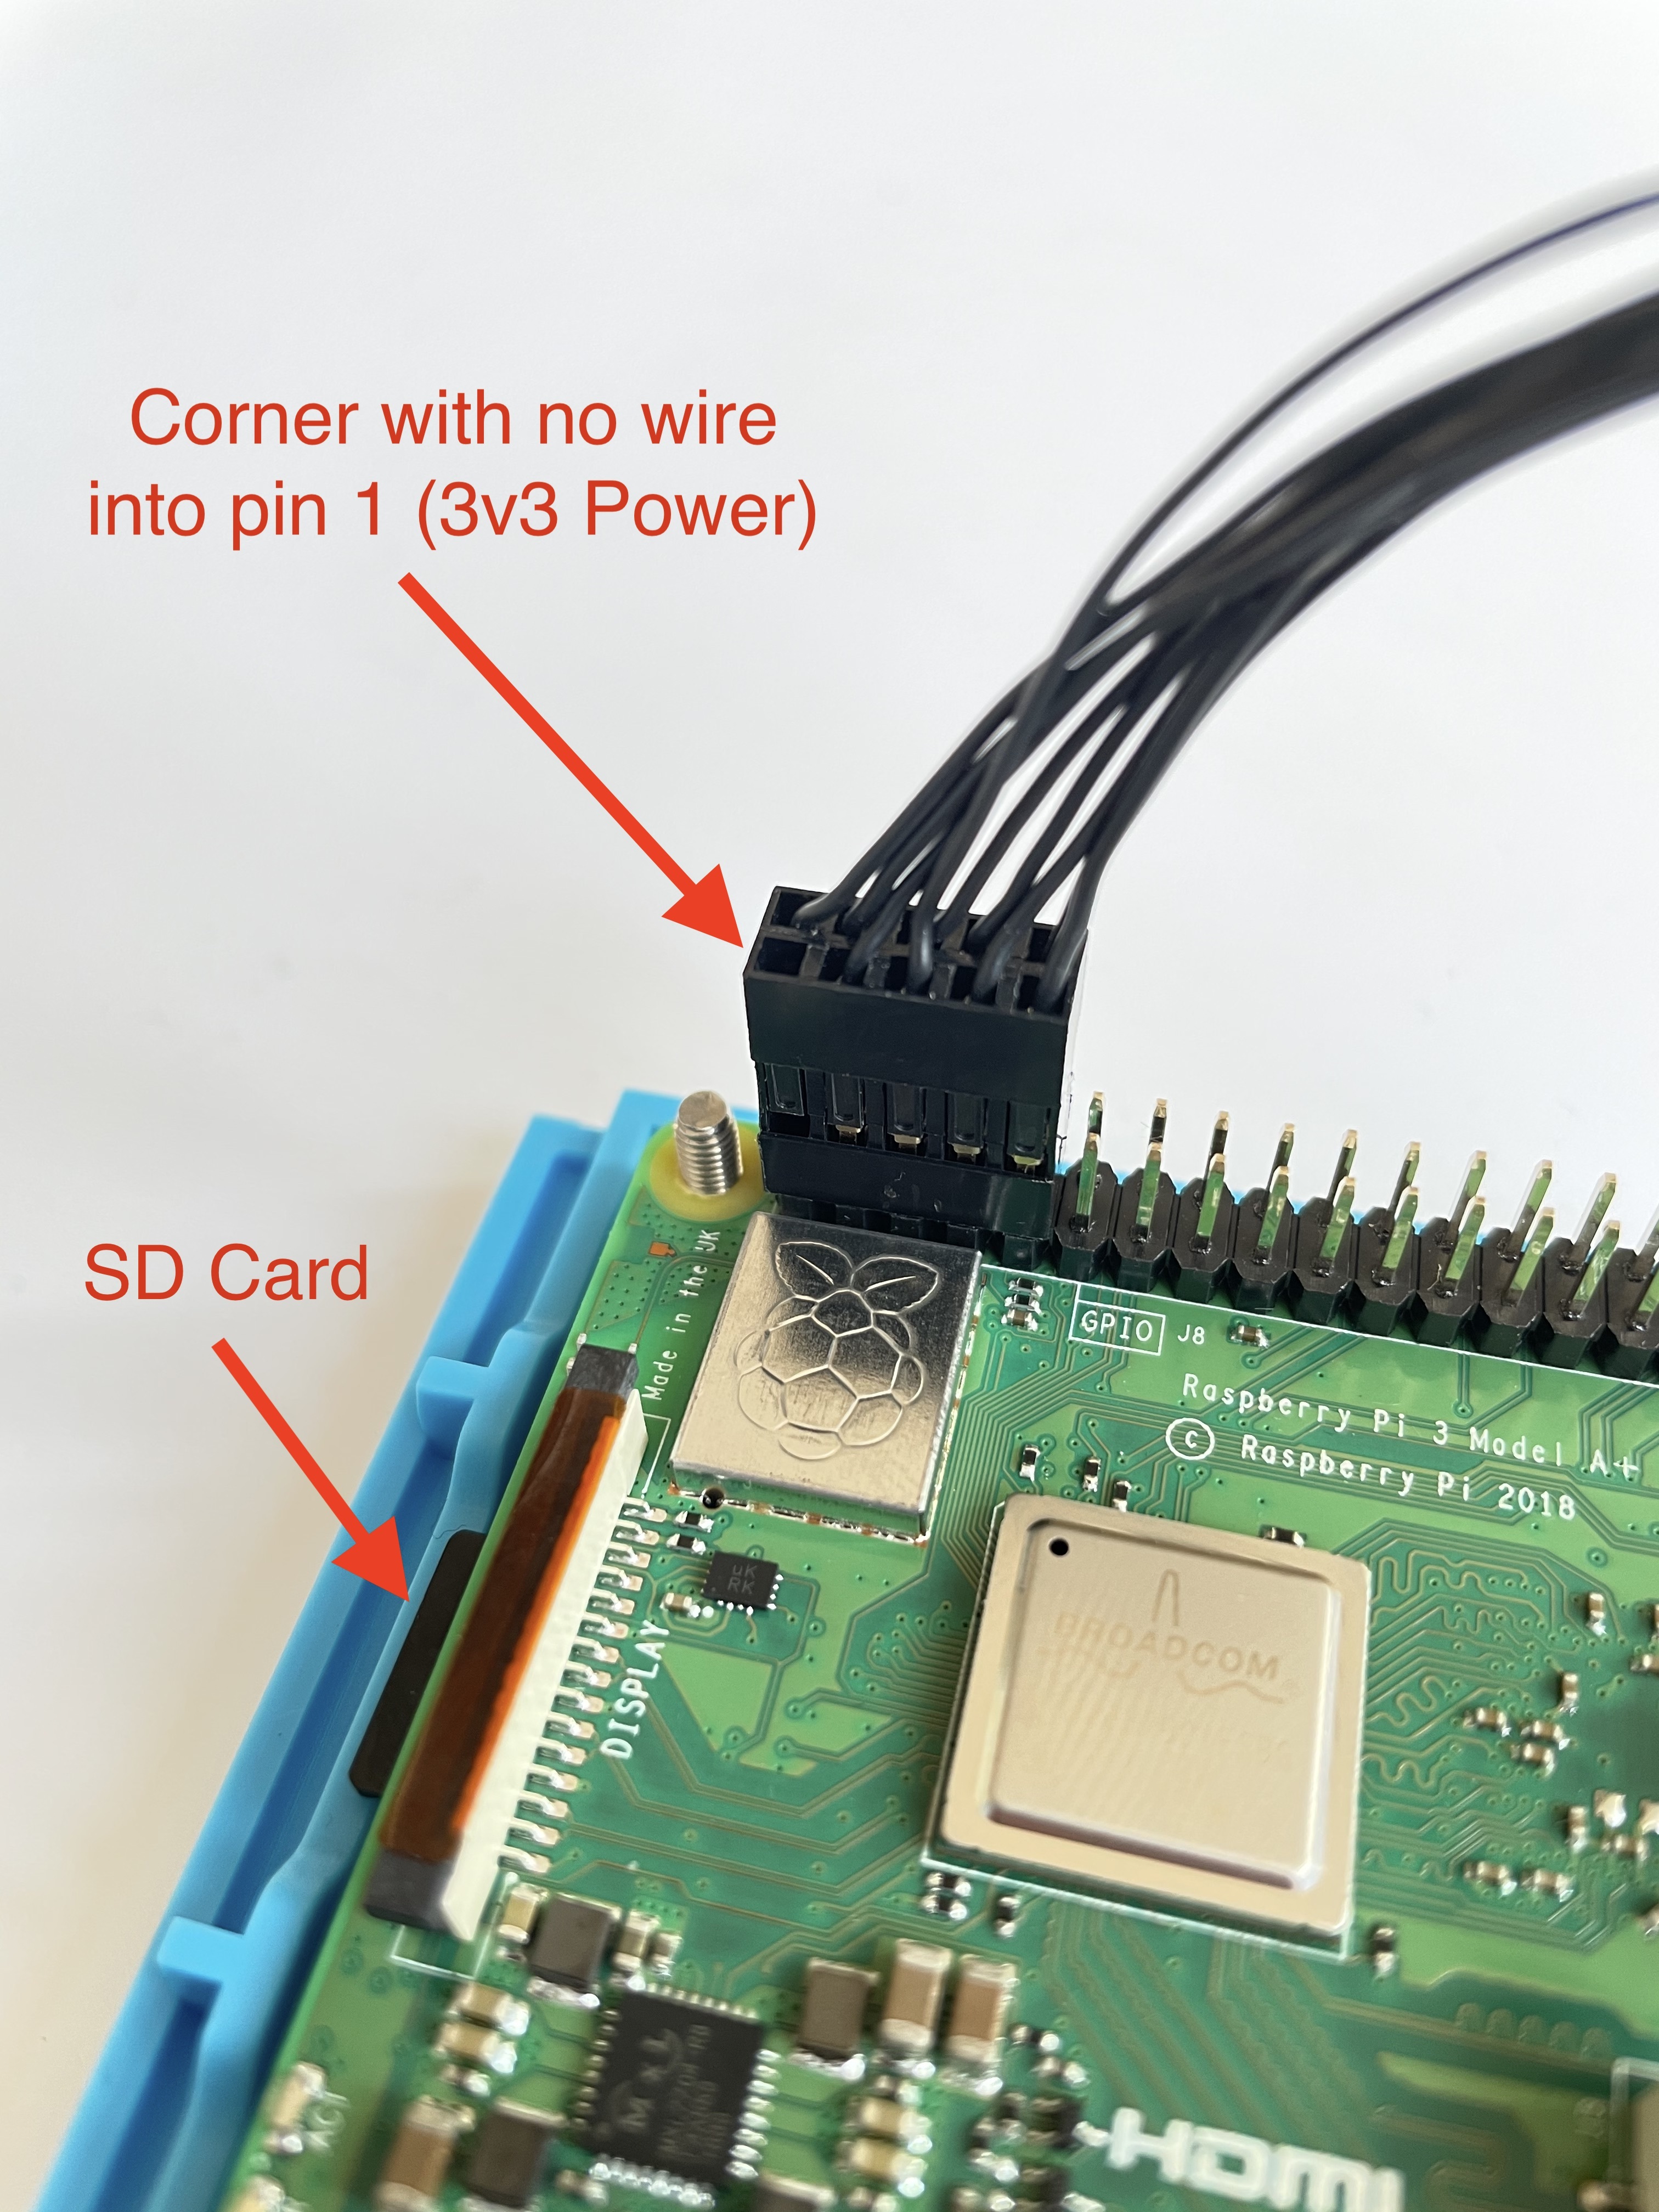
If you have a more recent cable it will have a blanked off pin. This will help you orient the connector as that end must overhang the Pi header connectors

Raspberry Pi Configuration
These instructions describe the GPIO serial connection for the recommended Pi 3A+, 3B+ and Zero 2 W models. Do not assume other models use the same serial device. All commands below run in the Pi's terminal.
Configure the UART
Marty's RIC board communicates with the Pi over UART (a serial connection). This setup disables the Pi's Bluetooth to make its PL011 UART available for Marty. It does not disable Wi-Fi. If you need Bluetooth peripherals, consult the official UART documentation for an alternative configuration.
On Raspberry Pi OS Bookworm and later, open:
sudo nano /boot/firmware/config.txt
On older Raspberry Pi OS releases, the file is usually /boot/config.txt instead. Edit the existing boot configuration file; do not create a second file at the other path.
Add the following under an existing [all] section, or append a new [all] section at the end, so the setting is not accidentally restricted to another Pi model. If this setting is already present and applies to your board, do not add it again.
[all]
dtoverlay=disable-bt
Save with Ctrl+O, press Enter, and exit with Ctrl+X. Then run:
sudo systemctl disable hciuart.service
sudo raspi-config
In raspi-config, choose Interface Options → Serial Port (menu numbers vary by OS version):
- Answer No to making a login shell accessible over serial.
- Answer Yes to enabling the serial port hardware.
- Finish and reboot when prompted. If no reboot is offered, run sudo reboot.
Your remote session will disconnect during the reboot. Wait for the Pi to return, then reconnect.
Check the serial device
For the recommended boards configured above, check:
ls -l /dev/ttyAMA0
You should see a device entry. If it is missing, recheck the board model, boot configuration and serial settings before running the program. /dev/serial0 is an alias whose target varies by model and configuration; it is not a universal replacement for this guide's device path.
Raspberry Pi software
Follow Setting Up Python on Raspberry Pi to install MartyPy in a virtual environment and verify the import. This keeps the library separate from the OS-managed Python installation. Return here after the installation check succeeds.
Check that it worked
Ensure the cable is connected correctly, Marty is powered on and there is space for it to move safely. Run only one Marty control program at a time.
In the Pi's terminal, create a file:
nano ~/marty_test.py
Paste this program, preserving the indentation:
from martypy import Marty

my_marty = Marty("exp", "/dev/ttyAMA0")
try:
    my_marty.walk()
finally:
    my_marty.close()
"exp" selects the expansion cable connection. "/dev/ttyAMA0" is the Pi's serial device for the configuration above; it is not a Chromebook device or a Wi-Fi address.
Save with Ctrl+O, Enter, then Ctrl+X. Use the environment created in the Python setup guide:
~/marty-env/bin/python ~/marty_test.py
Marty should walk, then the program should return to the terminal prompt. A successful program may print nothing. If an error appears, use the checks below.
Each lesson: connect, code and finish
- Power on Marty and wait for its Pi to boot.
- Connect to the assigned Pi using the remote-access method set up by your teacher.
- Edit your saved file with nano ~/marty_test.py, or use Thonny with the virtual environment selected as explained in the Python setup guide.
- Run it with ~/marty-env/bin/python ~/marty_test.py. This command works without activating the environment again.
- To interrupt a running terminal program, press Ctrl+C. Keep Marty in a safe area; interruption does not guarantee that a movement already sent to the robot stops immediately.
- Save your work. Run sudo shutdown -h now on the Pi and allow it to finish shutting down before switching off Marty. Losing the remote connection alone does not prove shutdown is complete; check the board's shutdown/activity indication.
Troubleshooting
| Symptom | What to check |
|---|---|
| Cannot reach the Pi | Check its power and Wi-Fi. For SSH, check the address, SSH service and whether the school network allows devices to communicate. For Connect, check the linked account and service; see the Primer. |
| externally-managed-environment | Install inside the virtual environment in the Pi Python guide. Do not use sudo pip or --break-system-packages to bypass this. |
| No module named martypy | Run the file with ~/marty-env/bin/python, or select that interpreter in your editor. Installing on the Chromebook does not install on the Pi. |
| /dev/ttyAMA0 does not exist | Check the Pi model, correct boot file, UART settings and reboot. Do not guess a replacement serial port. |
| Permission denied opening the serial port | Run ls -l /dev/ttyAMA0 and groups. If the device belongs to the dialout group and your user is absent, ask your administrator to add that Pi user to the group, then reboot. Do not make the device writable by everyone. |
| Serial port busy or connection fails | Close other programs using the port, confirm the serial login shell is disabled, and check the expansion cable with all power off. |
| Marty resets or the Pi disconnects during movement | Check battery charge and the power demand of the Pi and peripherals. Refer to the model and power recommendations above. |
If you need help, contact Robotical support with your Pi model, OS version (cat /etc/os-release), connection method and exact error message. Do not include passwords or access tokens.
What's next?
Explore First Steps With Python and the MartyPy function reference. Keep the Marty("exp", "/dev/ttyAMA0") connection when adapting examples for this Pi setup.
Programs can run on board without a continuous remote session when launched appropriately. Starting at boot or continuing after logout requires separate process/startup configuration; closing a remote terminal is not a reliable way to leave a program running.
See Raspberry Pi project ideas and hardware recommendations and Raspberry Pi Python projects.
Documentation reviewed: 29 September 2026. Hardware recommendations follow Robotical's linked guidance. Menu labels and serial mappings can vary with the Pi model and OS version.